

-
Shop
-
Learn to make
- Help & Guides
-
About
- Tuft in Residence
- Custom rugs
-
Yarn tension issues are often subtle and can result in inconsistent pile height, yarn falling out of the needle, yarn breaking, or bunching near the needle eye. The primary tension mechanism is the shutter strip — a small, adjustable metal strip near the needle eye.
| Symptom | Likely Cause | Fix / Action |
|---|---|---|
| Yarn keeps falling out of needle | Shutter strip too far back; insufficient friction on yarn | Move shutter strip forward to increase friction. See below. |
| Yarn breaking or bunching at needle eye | Shutter strip too far forward; too much friction | Move shutter strip back to reduce friction. |
| Thick yarn won't feed through needle | Shutter strip blocking the eye; opening too narrow for yarn diameter | Move shutter strip fully back so it does not show through the eye. |
| Pile height varies inconsistently | Yarn pulled from flat skein; yarn snagging on setup | Use cone stand with eyehook. Pull yarn from center of skein. |
| Machine jams / yarn bunches in mechanism | Yarn too soft/fluffy, or knotted yarn entering machine | Use coarser yarn. Clear jam by hand with machine OFF. Re-thread. |
| Tufting cloth coming through on front of rug | Foot/needle misalignment; needle hole positioned in front of foot | Rotate needle to forward-most position. Raise foot until needle hole is even with or behind foot. See below. |
| Yarn not staying in the cloth / falling out from back | Not pushing machine firmly enough; wrong yarn density; wrong cloth; tufting direction | Push machine harder against cloth. Use appropriate backing cloth. Ensure yarn is thick enough. Tuft in consistent direction. |
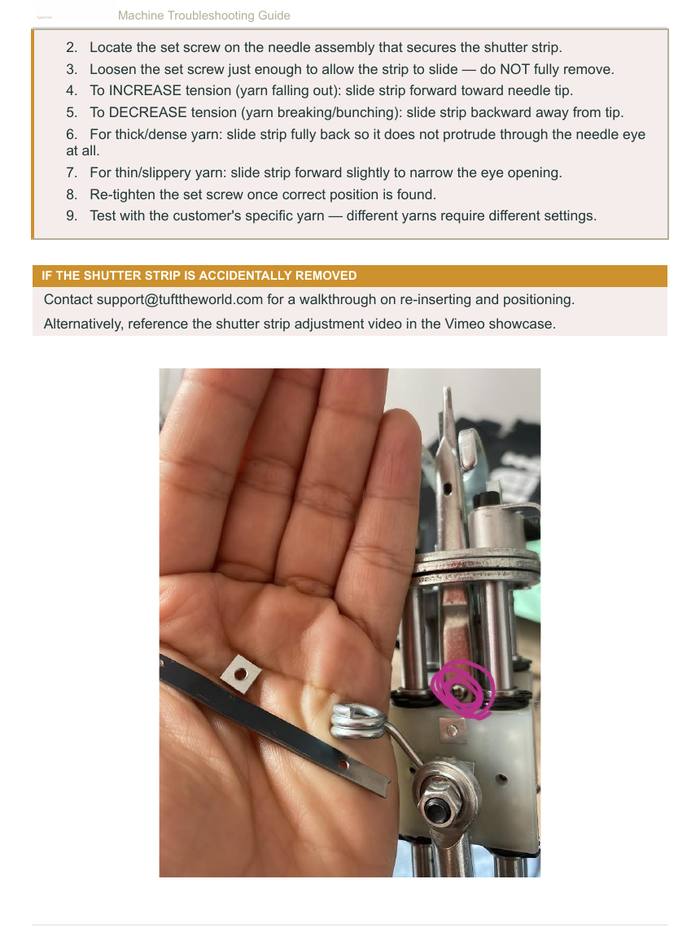
The shutter strip is a thin metal piece near the needle eye that controls yarn tension by increasing or decreasing friction as yarn passes through.
If tufting cloth is visible on the front (pile side) of the rug, this is almost always a foot-to-needle alignment problem. The hole of the needle must not be positioned in front of the foot when the needle is at its forward-most position.
If each cut tuft comes out with one leg noticeably shorter than the other (for example, one side at your full pile height and the other much shorter), the cause is almost always yarn feed, not a machine setting.
Why it happens: Cut-pile machines are purely mechanical. The scissors pull yarn through the needle eye as they extend and then cut it. If the yarn doesn't feed smoothly and evenly, the two legs of each tuft get pulled at different rates and end up different lengths.
What to check:
There's no adjustment on the machine itself that fixes this. Smoothing out your yarn feed is the solution. A light trim at the end can tidy up small differences, but it won't fix large ones.
On the AK-III, yarn is pulled into the needle by a feed wheel. A spring-loaded arm presses the yarn against this wheel. If the yarn stops feeding, check this arm first.
Most likely cause: The spring that presses the arm against the feed wheel has weakened. If the arm isn't pushing the yarn firmly against the wheel, a worn spring is almost always the reason.
Temporary fix: Wrap a rubber band around the machine and hook it onto the end of the arm so it pushes the arm hard against the feed wheel. We've used this method many times and it works well.
Permanent fix: Replacement springs are inexpensive and available from us. You can also send the machine in and we'll replace the spring and fully test it. Contact support@tufttheworld.com for a quote and see Sending Your Machine In for Repair.
If your machine suddenly stops mid-tuft and you see the shutter strip sticking out of the needle area, the bolt holding it has probably worked loose and let the strip slide forward.
The shutter strip's only job is to narrow the needle hole when you're tufting with very thin yarn or a single strand. If you tuft with normal-weight yarn or two strands, you can leave the strip out. If you do need it for thin yarn, contact support@tufttheworld.com for help putting it back.
See our 32 stock yarn colors, order a swatch card, and learn how custom-dyed yarn works: minimums, pricing, color matching, timing and mothproofing.
One of the most exciting things about tufting is that texture is a design element — not just a material property. Here's how to use it intentionally.
How to transfer a design to tufting cloth: draw freehand, trace, project or pounce, plus tips on mirroring, sizing detail and planning colors.