
Retrasos en el envío debido a TuftCon: cualquier pedido realizado entre ahora y el domingo se enviará a principios de la próxima semana.

Idioma

Translation missing: es.general.country.dropdown_label

  • Entrar
  • Carrito (0)
  • Terminar pedido
Tuft the World
  • Comercio 
    • Buy our book
    • equipos
    • Máquinas Tufting
    • Termina tu alfombra
    • Paño
    • Hilo
    • marcos
    • merchandising
    • Tarjetas de regalo
    • Todos los productos
  • Aprende con nosotros 
    • talleres presenciales
    • Philadelphia ceramics Workshops
    • Fiestas privadas y lecciones
    • Online course
    • Workshop info
  • Start Tufting 
    • Start tufting today
    • Compare Machines
    • Finishing pieces
    • Knowledge base
    • Tech support
  • Acerca de 
    • Sobre nosotros
    • Sostenibilidad
    • Presionar
    • Fun Articles
  • Tuft in Residence
  • Custom rugs
  • Idioma

    Translation missing: es.general.country.dropdown_label

  • Comercio 
    • Buy our book
    • equipos
    • Máquinas Tufting
    • Termina tu alfombra
    • Paño
    • Hilo
    • marcos
    • merchandising
    • Tarjetas de regalo
    • Todos los productos
  • Aprende con nosotros 
    • talleres presenciales
    • Philadelphia ceramics Workshops
    • Fiestas privadas y lecciones
    • Online course
    • Workshop info
  • Start Tufting 
    • Start tufting today
    • Compare Machines
    • Finishing pieces
    • Knowledge base
    • Tech support
  • Acerca de 
    • Sobre nosotros
    • Sostenibilidad
    • Presionar
    • Fun Articles
  • Tuft in Residence
  • Custom rugs
  • Idioma

    Translation missing: es.general.country.dropdown_label

Knowledge Base

Scissors & Cutting Mechanism Issues

octubre 03, 2026

Scissors are one of the most common sources of support requests. Issues range from yarn not being cut at all, to yarn getting trapped, to scissors wearing out over time. After any scissors replacement, the opener and closer must always be re-adjusted.

Issue Reference Table

Symptom Likely Cause Fix / Action
Machine not cutting / producing loops instead of cut pile Yarn too soft; scissors dull/worn; scissors adjusted incorrectly 1) Try coarser yarn   2) Replace scissors   3) Adjust opener — see below
Yarn getting trapped between scissors and needle Gap between scissors and needle allows yarn to slip behind Tighten set screw under scissors a few turns. See Gap Fix below.
Scissors opening too much / yarn catching Scissor opener adjusted too wide Reduce opening width via opener adjustment. See below.
Scissors grabbing yarn and pulling back into machine Scissors not closing cleanly; opener/closer out of alignment Adjust scissors opening mechanism. Reference 'Scissor Opener Adjustment' video.
Replaced scissors but still not cutting Opener/closer not adjusted after replacement; new scissors slightly different Always adjust opener AND closer after any scissors replacement.
Scissors rusty or stiff after shipping Moisture during transit oxidizes scissor metal Apply 2–3 drops of 3-in-1 oil directly to scissors joints. Work by hand.
Wrong size scissors received High-pile scissors are longer than medium/low-pile scissors Confirm machine model and pile height setting. Order correct replacement.
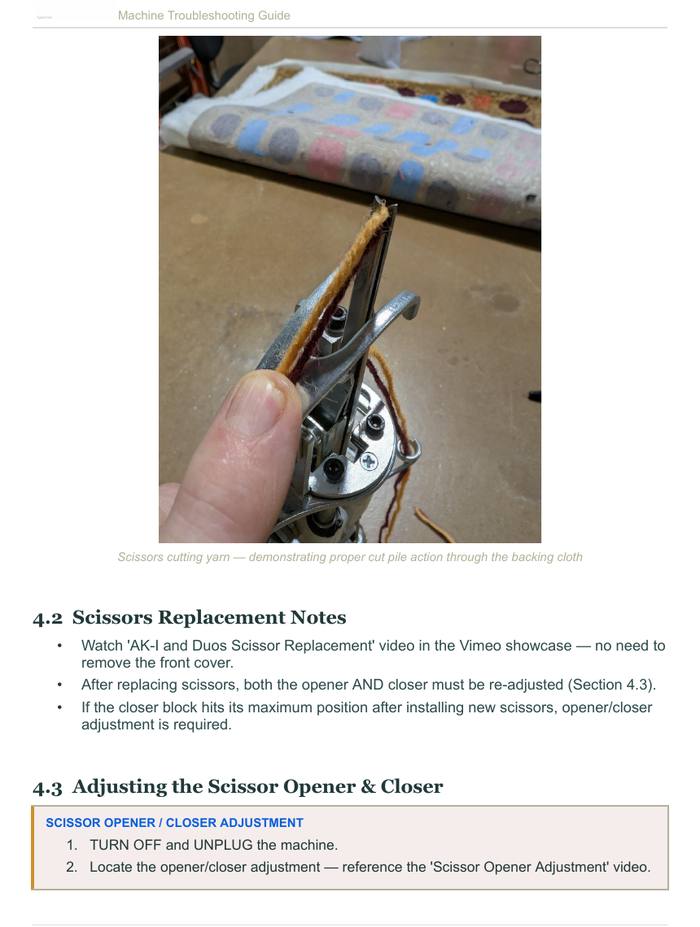
Scissors cutting yarn — demonstrating proper cut pile action through the backing cloth

Scissors Replacement Notes

  • Watch the 'AK-I and Duos Scissor Replacement' video in the Vimeo showcase — no need to remove the front cover
  • After replacing scissors, both the opener AND closer must be re-adjusted
  • If the closer block hits its maximum position after installing new scissors, opener/closer adjustment is required

Adjusting the Scissor Opener & Closer

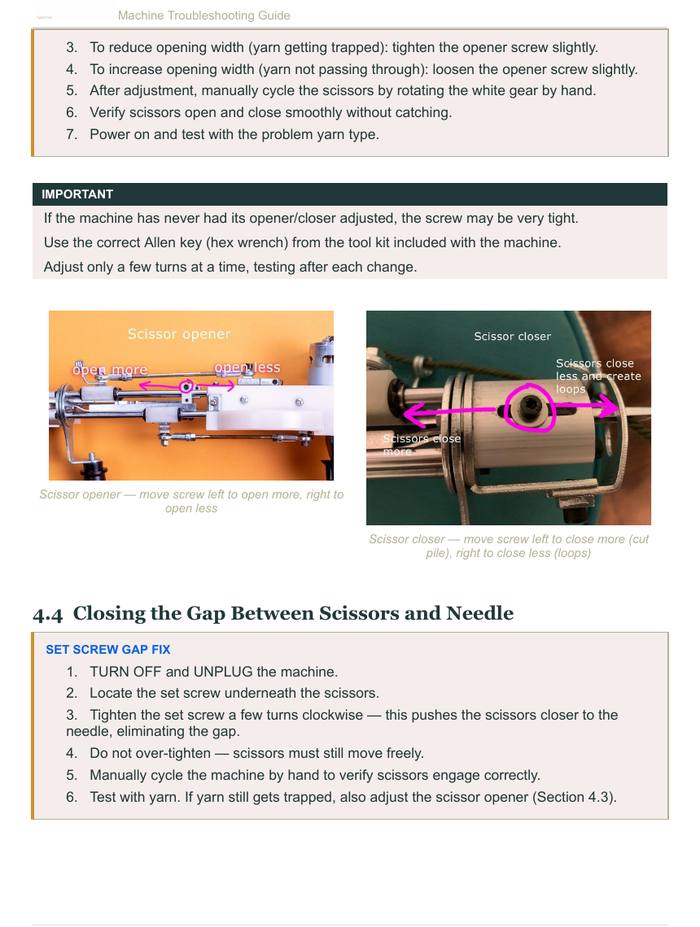
Scissor opener (left, move screw left to open more / right to open less) and scissor closer (right, move screw left to close more for cut pile / right to close less for loops)
Scissor Opener / Closer Adjustment
  1. Turn OFF and UNPLUG the machine.
  2. Locate the opener/closer adjustment — reference the 'Scissor Opener Adjustment' video.
  3. To reduce opening width (yarn getting trapped): tighten the opener screw slightly.
  4. To increase opening width (yarn not passing through): loosen the opener screw slightly.
  5. After adjustment, manually cycle the scissors by rotating the white gear by hand.
  6. Verify scissors open and close smoothly without catching.
  7. Power on and test with the problem yarn type.
If the machine has never had its opener/closer adjusted, the screw may be very tight. Use the correct Allen key (hex wrench) from the tool kit included with the machine. Adjust only a few turns at a time, testing after each change.

Closing the Gap Between Scissors and Needle

If yarn is slipping into the gap between the scissors and the needle, the set screw underneath the scissors needs to be tightened.

Set screw beneath scissors — tighten clockwise to close the gap between scissors and needle
Set Screw Gap Fix
  1. Turn OFF and UNPLUG the machine.
  2. Locate the set screw underneath the scissors.
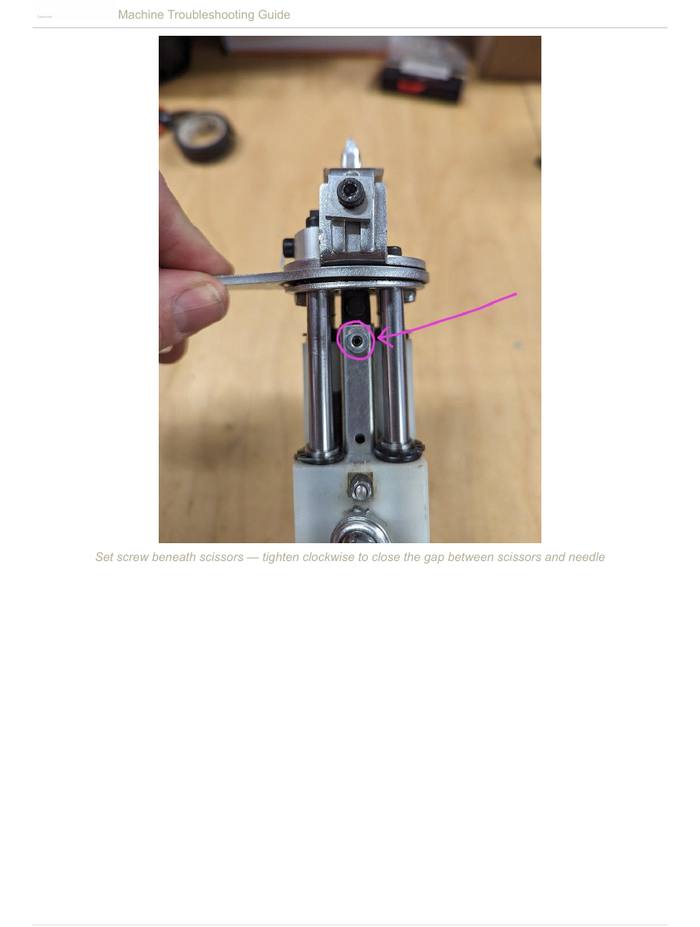
  3. Tighten the set screw a few turns clockwise — this pushes the scissors closer to the needle, eliminating the gap.
  4. Do not over-tighten — scissors must still move freely.
  5. Manually cycle the machine by hand to verify scissors engage correctly.
  6. Test with yarn. If yarn still gets trapped, also adjust the scissor opener.

Machine Not Cutting Cleanly, or Making Loops Instead of Cut Pile: Checks in Order

If your cut-pile machine starts leaving loops or uncut tufts, cutting unevenly, or producing choppy, fuzzy pile, it usually doesn't need a factory reset. The yarn is often the cause rather than the machine, and the scissors often just need adjusting. Work through these checks in order:

  1. Test a few different yarns. Not all yarns cut equally well. Super soft yarns are hard to cut, often don't tuft cleanly, and dull the scissors quickly. Try a coarser yarn, like rug wool, to see whether the yarn is the cause. Our machines cut both acrylic and wool, so a coarser yarn is a good benchmark. If the problem goes away with another yarn, the original yarn is the issue.
  2. Do the 360° scissor test. With the machine off and unplugged, rotate the lower gear slowly by hand through a full 360 degrees. Watch the scissors pull back into the machine and open, then come forward and close. They should fully open and fully close on every rotation. If they don't, adjust the scissor opener or closer using the scissor adjustment video in the Vimeo showcase. This is a simple adjustment that is worth learning, because it can come up again. The scissor parts and adjustment are the same on the DUO and our other cut and loop machines, so the DUO "scissor adjustment" video in your machine's video collection applies.
  3. Check for dull scissors. If several yarns fail and the scissors open and close fully, the scissors may need replacing. A machine that still cuts wool but struggles with acrylic is a common sign of worn scissors. A spare pair comes with your machine. Swap it in using the scissor replacement video, then re-adjust the opener and closer. Replacing the scissors will help, but if you keep using very soft yarn they may dull again quickly.
  4. Feed yarn through an eye hook. Put an eye hook at the top of your frame and run your yarn through it. This isn't about tension. It gives the machine enough slack so yarn feeds smoothly without snags.

On a brand-new machine, the scissors are very unlikely to be worn out. Scissors normally last a long time: rug wool is ideal for tufting machines, and we have machines we've used for many years, tufting mostly with wool, whose scissors have never needed replacing. If a new machine's cuts are still unclean with several yarns, the scissors may be faulty. Swap in the spare pair that came with your machine and contact support.

If you're not comfortable adjusting or replacing the scissors yourself, contact us. We can walk you through it on a video call, or you can send the machine in and we'll make the adjustment.

Spare Parts Bag, Sharpening and Buying Replacement Scissors

Check your spare parts bag first. Machines ship with a ziploc bag of spare parts that includes an extra set of scissors and a replacement scissor opener piece. If a part breaks or wears out, look there before ordering.

Before replacing scissors that aren't cutting: turn the machine off, rotate the lower gear by hand, and watch the scissors. If they don't fully open and close, another part has likely shifted and a quick adjustment may fix it — no new scissors needed.

Sharpening: Dull scissors can be sharpened yourself, or you can take them to a shop that sharpens knives and scissors.

Buying replacements: If the scissors do open and close fully but still won't cut, or you've lost your spare parts, we sell spare scissors (a few dollars each) and opener pieces. Contact support@tufttheworld.com and we'll send an invoice. The DUO Low, Medium and High Pile machines each use different scissors, so order spares that match your exact model. Needles rarely break, so most tufters don't need to buy spare needles. Replacement how-to videos are included in the video set sent with your machine, and we're happy to help with installation.

Machine Stalls Mid-Stroke or Scissors Cut Inconsistently

If your machine stops mid-stroke with the scissors still in the cloth while the motor keeps running, or the scissors leave uncut loops (accidental loop pile), the most common cause is a lack of oil.

  1. Oil the machine first. Oil every two hours of tufting with high-quality sewing machine oil or 3-in-1 oil. Oil points are similar across models; check your user manual for your machine's exact points.
  2. Check the scissors by hand. With the machine off, rotate the mechanism a full 360 degrees. The scissors should open and close completely. If they don't, they likely just need a quick adjustment.
  3. Replace if needed. A spare set of scissors is included in the box with your machine.

Keep in mind that every yarn behaves a little differently when tufted. If problems continue after oiling and adjusting, contact support.

Scissors Stuck Open / Won't Retract Into the Needle

If your scissors are sitting open too far, they may not be able to retract back into the needle, and the machine won't cycle properly.

  1. Turn OFF and UNPLUG the machine.
  2. Gently squeeze the scissors closed by hand or with pliers.
  3. Rotate the machine manually by hand and check that the scissors now retract into the needle smoothly.
  4. If it cycles well by hand, power on and test.

If the problem keeps coming back, the scissor closer may need adjustment. See Adjusting the Scissor Opener & Closer above.

Machine Not Cutting Yarn in Cut Mode: Knife Position, Sharpening and Replacement

If your machine is in cut mode but isn't cutting the yarn, start with the knife (blade):

  • Have you recently removed or changed the knife? Make sure it's reinstalled in the correct position. The video set you received with your machine shows the correct position.
  • Check that the knife sits flat. Once installed, the knife should be perfectly flat against the piece it bolts onto. There should be no gap between them. If you see a gap, loosen it, reseat it, and tighten it again.
  • If the knife hasn't been touched, it is probably dull. Sharpen it or replace it.

Sharpening: The blade needs regular sharpening. Depending on how much you tuft, plan on roughly once a month. You can take the knife to any professional knife or scissor sharpening service, or sharpen it yourself with standard sharpening techniques.

Replacement: Your machine's tool set should include a spare knife. Replacement knives are also available from us. Contact support@tufttheworld.com to order one.

AK-III: Checking Knife Placement

If your AK-III isn't cutting cleanly, check where the knife sits while it's mounted on the machine:

  • Turn the machine off and unplug it.
  • Rotate the mechanism by hand until the needle is at its lowest position.
  • Look at the knife. Its tip should sit close to the needle.
  • For a step-by-step guide, follow the knife placement section (around 24:26) of the AK-III Needle Change 2021 video in the Vimeo showcase you received with your machine.
  • If there's still a gap between the knife and the needle, try removing the small, thin washer.
  • Make sure all three pieces of the knife set are installed, including the piece that goes inside the needle chamber.

If the problem continues, email support with a photo of the knife on the machine with the needle at its lowest position.

DUO: Scissors Not Cutting After Changing Pile Height

If your DUO stops cutting yarn (yarn stays in the fabric uncut) or the scissors ride out of their channel, especially after changing pile height, work through these steps with the machine off and unplugged:

  1. Set the scissor opener and closer. Get the scissors closed first (easiest when they are fully extended). Then rotate the machine by hand and watch the scissors retract and extend. They should just barely open all the way and just barely close all the way.
  2. Check how far they open. The scissors should open enough to touch the edges of the underside of the needle, so they are open enough to grab the yarn when they reach the hole.
  3. Check the scissors ride under the needle. At the lowest pile setting, there may be a gap between the scissors and the needle. Adjust the tiny set screw under the scissor channel to push the scissors up.
  4. Extend the lower bar if needed. Moving from the shortest to the highest setting can need extra adjustment so the scissors close more. Loosen one side of the threaded rod and rotate the piece with the bearing one full turn, then check whether the scissors close more. If not, rotate one more turn. Alternatively, move the point on the pink gear from 8mm to 10mm.

Tip: Take measurements, photos and videos before you adjust so you can return to your original settings later. Every machine is slightly different, and 1–2 mm can be the difference between cutting and not cutting. The pile height video and the scissor adjustment video in our Vimeo showcase both show this process. If you're still stuck, contact support. We can also set up a video call.

AK-5 Scissors: Spare Pair, Pre-Replacement Check, and Bar Length

AK-5 owners: the spare pair of scissors in the small zip-lock bag that ships with your machine is a replacement set for the scissors on the machine. The AK-5 scissor mechanism is exactly the same as on the DUO, so the DUO scissor adjustment and replacement videos in the Vimeo showcase apply to the AK-5 too.

Before replacing dull scissors, check they open and close fully. With the machine off and unplugged, rotate the lower mechanism by hand and watch the scissors closely. They should retract into the machine and open, then close completely when they reach the forward-most position. If they don't close all the way, adjust the scissor opener and closer first. Scissors that don't fully close won't cut the yarn cleanly. You may see uncut, bunched tufts, or yarn pulling back through the cloth on the back stroke.

Never change the needle bar lengths when adjusting or replacing scissors, or at any other time. Changing bar length changes the way the machine works. If you're following a video, make sure it's the one for adjusting and changing scissors.

Scissors Leaving a Strand Uncut? Check the Closer Before Replacing

If your scissors seem dull or leave a tiny strand of yarn uncut, they may simply not be closing all the way. Check this before replacing them.

  1. Turn OFF and UNPLUG the machine.
  2. Rotate the machine by hand and watch whether the scissors open and close fully.
  3. If they don't close completely, find the scissor closer piece at the front of the machine. Loosen its bolt, move it slightly toward the back of the machine, and tighten it again.
  4. Rotate by hand again to make sure it runs smoothly. If the machine binds up, the scissors are hitting the closer too hard. Move it back a little.

Most machines come with a spare set of scissors in the small ziplock bag included with the machine. We also sell spare sets.

Scissor Opener Keeps Breaking or Scissors Wearing Out Fast

If your scissor opener keeps breaking, or your scissors wear out or fail early, the opener or closer is usually set incorrectly.

  • Opener: Set it so the scissors open all the way, and no further. If the opener is set too far forward, the scissors hit it too hard, which causes the opener to fail early.
  • Closer: If the closer hits the scissors too hard, the scissors wear out early. If you've changed any settings, returning them to factory settings often fixes the problem without sending the machine in.

Follow the opener/closer adjustment steps above, or watch the adjustment videos shared with your machine. A spare scissor opener comes in your machine's parts bag, and replacements can be ordered by contacting support.

Scissors Ripping the Tufting Cloth

If your cloth is being torn or shredded while you tuft, new scissors may not fix it. Cloth damage is often caused by something else on the machine, not the scissors themselves.

  • First check that the scissors open and close fully when you turn the white gear (pink gear on the DUO) by hand.
  • Make sure you are pressing the foot firmly against the cloth. See Why Is Tufting Cloth Coming Through the Front of My Rug?
  • Check foot-to-needle alignment and your pile height setting.

If the cloth is still ripping after these checks, contact support with a photo. The machine may need to be sent in for repair.

Scissors Covering the Needle Hole (Can't Thread)

If the scissors are covering the needle eye and you can't thread the machine, the machine isn't returning to its home position. This is usually caused by the grounding bar having shifted slightly. It's an easy fix: follow our grounding bar adjustment video to reposition it so the machine returns home and the needle eye is clear.

Replacing and Adjusting the Scissor Opener

The scissor opener is a small part that pushes the scissors open on each stroke. If it breaks or wears out, we sell replacement scissor openers — contact support@tufttheworld.com with a photo of the part and your machine model.

Don't forget the screw: the opener is held on by a small, special screw. If yours is lost or damaged, let us know when you order so we can include one. It is a McMaster-Carr part (likely 92000A113), sold in packs of 25.

If the scissors still aren't opening after installing the opener:

  1. Turn OFF and UNPLUG the machine.
  2. Loosen the bolt that attaches the scissor opener assembly to the machine (not the small screw holding the opener itself).
  3. Slide the opener forward a small amount, then re-tighten.
  4. Rotate the machine fully by hand and watch that the scissors open and close properly.

Caution: don't move the opener too far forward — if it sits too far forward, the machine will strike it too hard and break it. Make small adjustments and re-check by hand each time.

DUO Still Making Loops With Scissors Installed

If your DUO has the scissor mechanism installed but is still making loops instead of cut pile, check that the scissor closer is present. This is the piece that closes the scissors. Without it the scissors won't cut and the machine keeps tufting loops. Scissor closers are sold as a replacement part. Contact support with your order number or the email you ordered with, and a photo of your machine, so we can send the correct part.

Yarn Bunching or Catching at the "V" of the Scissors

If yarn bunches up in the scissor area as soon as you start tufting, check the scissors before assuming the machine needs repair:

  1. Turn the machine off and remove all yarn.
  2. Rotate the machine by hand using the big gear on the bottom. The scissors should fully open and close as the needle pushes forward. Rotate it a few times to check.
  3. If the yarn is catching between the scissors and the underside of the needle, close the gap with the set screw (see Gap Fix above).
  4. If the scissors open and close correctly but yarn keeps catching right in the middle of the "V" of the scissors, the scissors are worn and should be replaced. A spare set of scissors is included with your machine. Follow the scissor replacement video, then re-adjust the opener and closer.

If you'd rather not replace them yourself, you can send the machine in for repair (you cover shipping both ways).


Tweet Share Pin It Email

Ver artículo completo

Creating Texture and Dimension

octubre 03, 2026

One of the most exciting things about tufting is that texture is a design element — not just a material property. Here's how to use it intentionally.

Ver artículo completo

Transferring Your Design to the Cloth

octubre 03, 2026

Getting your design from paper (or screen) onto your tufting cloth is one of the first steps in every project — and there are a few approaches depending on…

Ver artículo completo

Bulk & Wholesale Pricing for Studios and Teachers

octubre 03, 2026

If you teach workshops or run a studio, we offer 25% off bulk supplies. The discount can be combined with current sale prices on machines.

Ver artículo completo


  • Cuenta de Ingreso
  • Programa de afiliación
  • Aplicación de compras
  • Transporte
  • Política de devoluciones
  • Términos y condiciones
  • Política de privacidad
  • Contact Us
  • Our top tufting tips
  • Reflect rewards
  • Right of Withdrawl - EU

Idioma

© 2026 Tuft the World. Tecnología de Shopify

  •  
  •